Pricing and licenses
What functionality is included in the free BASE app?
BASE is the app that you can download for free in the App Store. It contains the following functionality:
- Scheduling of classes and appointments
- Repeating events, rescheduling, editing, cancelling
- Automatic confirmation, reschedule and cancellation emails with templates
- Client management (import, add, contact details, photo, comments)
- Registration of sales
- Registration of payments
- Progress tracking
Author: Rob
Last update: 2018-05-13 14:22
Do you have a trial so I can test the PRO or STUDIO license for free?
Yes. You can request a trial indicating which license you want to try by writing an email to support@bobclass.com. You will need to have the BASE app installed - which you can download for free from the Apple App Store. You also need to have a Bobclass Cloud account which you can create from the app's settings > Bobclass Cloud. Let us know which email address you use for Bobclass Cloud so we can enable the trial license for this account. The trial lasts for 14 days, without commitments and you do not need to provide any credit card details.
Author: Rob
Last update: 2018-05-13 22:41
When and how can I cancel my PRO or STUDIO license?
You can cancel your subscription within one month after activation or renewal and by doing so you will not be charged anymore. Automatic renewals are month by month. As an example: If you activated your subscription on the 5th of May then it will run till the 5th of June and you can cancel until the 4th of June. Here is how to view, change or cancel your active subscriptions: https://support.apple.com/en-us/HT202039
Author: Rob
Last update: 2020-07-03 11:27
How do I get charged for the PRO or STUDIO subscription?
Subscriptions are managed through the App Store. This means that activation, renewal and cancellations will be managed by Apple through your Apple ID and linked payment method.
Author: Rob
Last update: 2018-05-13 22:49
I am subscribed to a premium license (Pro or Studio) but the app does not show the premium functionality yet.
Licenses not kicking is mostly caused by the App Store not having sent the green light signal to the app. Try the following to enable your license:
- Make sure you are logged in to Bobclass Cloud (Settings > Bobclass Cloud) on all your devices.
- Go to Settings > Upgrade to Pro/Studio, scroll down and click the Restore Purchase button.
- Restart your device and launch the app again.
If the above does not work, then there may be an issue with payment of the subscription in the App Store. You can check this in the iOS settings of your device:
Settings (of your device) > Apple ID (top of screen, click your name) > iTunes & App Store > Apple ID (your email address) > View Apple ID > Subscriptions
Author: Rob
Last update: 2018-09-26 11:13
There was a problem with my payment for the Pro or Studio subscription, how do I solve this?
The Pro and Studio subscriptions that are offered in Bobclass are sold as in-app purchases. This means that they are sold through the Apple App Store where Apple takes care of the monthly billing. If Apple tries to charge your credit card (the one that is associated to your Apple ID) and it gets declined, then you will receive an email. There are a few days of grace period where you can solve the problem before the premium functionality stops working. Here is how to solve it:
- On your device, go to the (iOS) settings:
- Click on your Apple ID - this is your profile photo at the top
- Click on iTunes & App Store
- Click on your email address (Apple ID) at the top
- Select View Apple ID on the popup
- Click Payment Information
Here is where you can replace an expired credit card or solve any other problem you may have with the payment method.
If you need assistance or need a few days more to solve the problem, you can ask us for help: support@bobclass.com - we can enable Pro or Studio for a few days while you solve the payment method problem.
Author: Rob
Last update: 2018-10-01 09:56
What is the price?
Bobclass comes in three versions with different cost:
Base: this is the app that can be downloaded from the App Store. It is free and can be used without any additional cost. Base is required for any additional premium functionality.
Pro: this is premium functionality that is sold as an in-app purchase subscriptions. It costs 15.99 USD / 15,99 EUR / 15.99 GBP per month. If you are using a different currency, you can go to the app's settings > Upgrade to... and at the bottom of the screen the local price is shown on the button.
Studio: this is premium functionality that is sold as an in-app purchase subscriptions. It costs 31.99 USD / 31,99 EUR / 31.99 GBP per month. If you are using a different currency, you can go to the app's settings > Upgrade to... and at the bottom of the screen the local price is shown on the button.
Apple may change prices at any time because of currency fluctuations, so please check in the app itself (see above) what the actual price is for your locale.
Author: Rob
Last update: 2021-04-03 10:16
How can I change the payment method for my subscription?
The Pro and Studio subscriptions that are offered in Bobclass are sold as in-app purchases. This means that they are sold through the Apple App Store where Apple takes care of the monthly billing using the payment method that is associated with your Apple ID. If you want to use a different payment method to pay your Bobclass subscription, you can do this through your Apple ID as follows:
- On your device, go to the (iOS) settings:
- Click on your Apple ID - this is your profile photo at the top
- Click on iTunes & App Store
- Click on your email address (Apple ID) at the top
- Select View Apple ID on the popup
- Click Payment Information
- Here is where you can change the payment method.
Author: Rob
Last update: 2018-11-04 22:13
Web calendars
Can clients pay online? Does Bobclass process payments?
Yes. All you need to do is to create a Stripe Connect account. Learn more here:
Author: Rob
Last update: 2019-03-24 19:47
What is the difference between the Web Roster and the Availability Calendar?
Both are online calendars that can be viewed by your clients through a web browser. The Web Roster shows scheduled classes such as "Monday 9:00 AM, Zumba, Metropolitan Gym with Roger", whereas the Availability Calendar just shows when you are available and when not (white vs gray cells). In the Web Roster clients can request to be added to an existing (group) class and in the Availability Calendar clients can request an appointment in a certain time slot. If you have defined different activities and instructors, then the client also needs to pick from those.
Which calendar is best for you and your clients depends on your type of business: Group classes or private appointments. You can use both of course.
Here are some examples of the Web Roster and an Availability Calendar.
Author: Rob
Last update: 2020-08-21 12:56
Can I embed the client web calendar in my own web site?
Yes, you can. The client calendars are nothing more than a web page that we host on our servers. They have a URL (link) that can be used anywhere. You can find the URLs to your client calendars in the app's settings > Online Booking > Details & Settings (see image). They have the following format (the last part of the URL will be unique for your business):
http://bobclass.com/classes/c4fit
http://bobclass.com/appointments/c4fit
Pick the one you want to share with your client and use it as a simple link on your web page, i.e. a simple "punch-out" to the web calendar. Alternatively, you can embed the link into your page. This requires a bit of simple HTML editing using a so-called iFrame. If you do not know what this is, ask any web developer who can add this to your website. This way, the calendar will sit nicely in your own page and you do not have to punch out.


Author: Rob
Last update: 2020-08-21 12:55
Why do I not get to see a Book button in my client web roster?
To enable the Book button in the web calendar for your clients please check the following:
- Is Self Booking enabled?
- Go to settings > Client Calendars and enable the second switch (Self-Booking).
- Does the class that you scheduled in the app use a pre-defined activity that is set to Public?
- Go to settings > Activities, select the activity and make sure the switch for Public is enabled.
- Then edit the class in the app and select that activity from the list. Save/book the class and refresh the web calendar.
- Is there a booking recipient mail set?
- Go to settings > Client Calendars > Class Roster > Roster Settings and make sure that the first email field has a valid email address.
- Refresh the web calendar.
Author: Rob
Last update: 2018-10-16 12:21
Can I view my Bobclass calendar in my other calendars such as Google, iCal or Outlook?
Yes. You can use the iCal link for that. Once you have enabled the client calendar functionality, you will have a unique iCal link (URL) that you can use in external calendars such as iOS calendar, iCal for Mac, Outlook, Windows Calendar and Google calendar. The only thing you need to do is to subscribe from one of those calendars to that URL:
- In the app's settings navigate to Online Booking
- Make sure the switch (Enable Public iCal) is enabled.
- Then click the Details and Settings button in that same section.
- Here you can see the iCal link. Copy the link or send it to yourself - you want to make sure it gets to your computer or wherever you want to use the external calendar.
- Go to your computer (or other device where you want to use a calendar) and open the calendar application of choice.
- View the further instructions for Google Calendar, iOS, Mac OS or Windows calendars in this PDF document.

Author: Rob
Last update: 2022-12-03 14:48
How do I display my schedule in Google Calendar or other calendar apps?
This can be done using the iCal link that the app provides. You would then subscribe to that link in Google Calendar:
- In the app's settings navigate to Online Booking
- Make sure the switch (Enable Public iCal) is enabled.
- Then click the Details and Settings button in that same section.
- Here you can see the iCal link. Copy the link (Share Link)
- Open Google Calendar (https://calendar.google.com)
- Click the button with the three dots next to Add Calendar and select From URL
- Enter the iCal link from the second step (for example https://bobclass.com/ical/c4fit)
- After a few minutes, the appointments will be loaded and visible in Google Calendar.
- You can enable or disable the visibility of this calendar in the left hand side panel in the Other calendars section.
- Note that Google does not sync very frequently; changes may take up to a few hours!

Author: Rob
Last update: 2022-12-03 14:51
Account and privacy
Where is my data stored?
You can choose where your data is stored:
- On your local device only
- Or on both your local device and in Bobclass Cloud
If you run Bobclass on one device only and do not need a cloud backup, then storage on your local device only is a valid option. We recommend in that case to at least enable device backups as offered by iOS.
If you want to share data with others or use multiple devices, then Bobclass Cloud is needed so that your data can be synchronized. Bobclass Cloud keeps an exact copy of your database in the cloud and synchronizes changes (made on- or offline) from connected devices. Bobclass Cloud uses Google App Engine for the core database and Amazon S3 for attachments, both of which use end-to-end encryption technology.
Note that you can always access your data, regardless of whether you use a cloud account or not. This is because the data is stored on the device's memory, meaning you can access it even offline, without internet connection. The sync engine in the cloud makes sure of synchronization between the device(s) and the cloud.
Author: Rob
Last update: 2018-10-08 09:52
Can I change the email address that I used for my Bobclass Cloud account?
No. The email address that you initially used to create your Bobclass Cloud account is used as a user ID and cannot be changed. It is not used for communication with your clients. However, if you still want to use a different email address, you can simply create a new Bobclass Cloud account:
- Go to the app's settings > Bobclass Cloud
- Log out
- On that same page, create a new Bobclass Cloud account
- You will receive an email that you need to confirm.
- Log in to the new account - this should be done from the device that contains the latest calendar/client data.
- The app will now upload the entire database to cloud. This can take time and do not interrupt it! Leave the app in the foreground and make some tea.
- Once the data is uploaded, go to your other devices where you log out from the old account and log in to the new account.
Author: Rob
Last update: 2018-10-08 09:48
Operating system and hardware requirements
Does Bobclass run on Android?
At the moment the answer is no. We have plans for an Android version but cannot give a concrete time line yet. Send us a message at info@bobclass.com if you want to be added to the notification list for updates on an Android version.
Author: Rob
Last update: 2018-05-13 22:03
Does Bobclass run on Mac OS?
Yes, Bobclass is also available for Mac. It can be downloaded in the App Store: https://apps.apple.com/es/app/bobclass-appointment-calendar/id900013696?l=en#?platform=mac
Author: Rob
Last update: 2020-04-20 10:22
Does Bobclass run on Windows?
At the moment the answer is no. We have plans for a Windows version but cannot give a concrete time line yet. There is a Mac version though:https://apps.apple.com/es/app/bobclass-appointment-calendar/id900013696?l=en#?platform=mac
Author: Rob
Last update: 2020-04-20 10:22
Is there a web version of Bobclass?
Yes and no. With Bobclass PRO and STUDIO you can publish your calendar to a web page that is hosted in our cloud. This web page can be viewed by your clients and anyone who has the link and a web browser. Clients can request bookings into classes or request an appointment. On the other hand, to create the booking or set your availability, you will need the native app that runs on iPad or iPhone.
Author: Rob
Last update: 2018-05-13 22:07
What are the system requirements to run Bobclass?
The lowest version of iOS that is required to run the app is iOS 10, which are iPad models 4, Air and higher, iPhone 5 and higher, all models iPad Pro, and 6th generaton iPod and higher.
Author: Rob
Last update: 2018-10-05 21:38
Localization
How do I change the currency?
The currency that is used in Bobclass is inherited from the system settings on your device. If you want to change the currency, follow these steps:
- Close Bobclass
- Open iOS settings
- Go to >General
- Go to >Language & Region
- Select Region
- Set the region to the country for which you want to use the currency
Author: Rob
Last update: 2018-07-03 10:27
How do I change the language?
The language that is used in Bobclass is inherited from the system settings on your device. If you want to change the currency, follow these steps:
- Close Bobclass
- Open iOS settings
- Go to >General
- Go to >Language & Region
- Select iPhone/iPad language at the top of the screen
- Set the language you want to use
Author: Rob
Last update: 2018-07-03 10:29
How do I change the time format between AM/PM and 24 hours notation?
Bobclass uses the localization settings of your device, meaning whatever time format your devices uses, Bobclass will also use. The same goes for language and currency. To change the time format, go to the iOS settings on your device:
Settings > General > Date & Time > 24-Hour Time
For the client web calendars, you also need to make sure your regional settings are correct:
Settings > General > Language & Region > Region
After you have changed this, you should edit/create an event in the Bobclass app, so that it will push the regional changes to the client web calendar. Then on the web, refresh the page.
Author: Rob
Last update: 2018-07-26 12:00
Email and messaging
How do I change the email address from which the confirmation emails are sent?
Bobclass uses the standard email functionality of your device so you'd need to go to the iOS settings of the device to be change the email address:
- iOS Settings > Mail > Default Account
- Select the email account that you want to use
If you do not see any email accounts here, then that means that you did not define any yet on your device. In that case follow these steps:
- iOS Settings > Accounts & Passwords > Add Account
- Select the type of account that you want to add, etc.
Once the account was created, you should test it using the default Mail app that comes with your device. It is the app with the envelope icon. If you are able to send emails from that app, you will also be able to send emails from Bobclass. If you cannot find the Mail app, then it was probably deleted and you must reinstall it.
Author: Rob
Last update: 2018-07-25 09:41
Confirmation and reminder emails are not sent
Bobclass uses the standard email functionality of your device and therefore needs the system email app together with an active email account. You should test it using the default email app that comes with your device. It is the app with the envelope icon. If you are able to send emails from that app, you will also be able to send emails from Bobclass. If you are not, then you should first check whether you have the Mail app installed on your device. It looks like this:

If you do not find the standard mail app, then this is because someone deleted it. Unlike other built-in apps such as Safari or the Camera app, it is possible to delete the Mail app on your device. To reinstall the Mail app, do the following:
- Go to the App Store
- Search for "Mail" in the search field
- Once you’ve found the Mail app in the App Store, tap the Cloud button to its right. The Mail app will download and reinstall on your device and you’ll be able to use it again.
- At this point you probably also need to create an email account on your device, see instructions here.
Author: Rob
Last update: 2018-10-28 20:15
Using templates for email and SMS text messages
Bobclass can send messages to your clients in the following cases:
- After adding booking a class/appointment - automatic
- After modifying a class/appointment (e.g. change of location) - automatic
- After cancelling a class/appointment (either by removing a client from or by deleting the entire class/appointment) - automatic
- Reminding a client of an upcoming class/appointment - manual
- Sending any kind of message to one or more clients
The confirmation, modification and cancellation and reminder messages use templates that can be modified in the app's settings > Message Templates.
To edit a message template, enable it first and then click on the text. This will invoke a popup where the text can be modified. Be mindful of the fact that the template text uses parameters (the words preceded by #) that are replaced by real values when the message is created later. You can see the parameters that you can use in the orange text below the text field. Make sure to keep the brackets and tags in place, but all other regular text can be modified to your needs.
If at any point you want to restore the text messages to the original ones, just scroll down and click the button Restore...


Author: Rob
Last update: 2018-11-02 17:02
Can I send SMS text messages from iPad?
By default, an iPad does not let you send SMS messages even when it has 4G/LTE capabilities. However, you can use SMS forwarding that lets you use your iPhone's SMS text capabilities to send SMS messages from your iPad. It takes a few steps to set it up which are described in this article.
Author: Rob
Last update: 2019-03-22 13:53
Scheduling
I want to make a class repeating but the system does not offer me any target slots.
This is probably because the Granularity in the Calendar Display Settings is set too high. This value determines when sessions can start, so when this is set for example at Every 30 minutes, this means, the session can start at xx:00h and xx:30h. You should reduce this value if you want to see more target slots:
- Go to the app's Settings > Calendar Display
- Reduce Granularity to Every 5 minutes, or 10 minutes, experiment with what works best for you.
- Set Default Duration to a lower value if you want to squeeze sessions in smaller slots.
Another possible reason why you do not get to see any target slots is that the target slots are already taken in case you are running Base or Pro versions of Bobclass. If you are running Bobclass Studio, then you can schedule sessions in parallel.

Author: Rob
Last update: 2018-11-09 12:01
How can I block a full day?
- Tap on the strip at the top of the day column in the calendar
- In the dialog, select the Block tab
- Select the instructor for whom you want to block the day

Author: Rob
Last update: 2018-09-27 10:26
Create repeat sessions
Bobclass lets you create a series of identical sessions by selecting one and copying them (repeat) into future target dates. The system lets you pick regular recurring dates (such as every Monday) but also irregular ones (such as Monday, Wednesday this week and Tuesday, Thursday next week).
- Select an existing session or create one if you're starting from scratch
- Tap the copy button in the top row of the session details. The icon looks like two rectangles on top of each other.
- In the next step, select the target slots. If you do not see any or just a few here, then you probably need to change granularity (see here).
- Students that were already in the session can be copied along.


Author: Rob
Last update: 2018-11-09 12:03
Adding a client to a series of existing sessions
When you have a series of existing sessions, such as every Monday at 9:00 for 10 weeks, and you want to add a client to those:
- Go to the appointment manager (the magnifying glass icon in the top navigation)
- Select the Bookings tab
- Filter the set using the left hand side panel if necessary
- Tap the Select button
- Select the bookings (sessions) to which you want to add the client
- Tap the icon with the human and the + symbol
- In the dialogue, tap the client you want to add, tap another time to select
- Repeat for more clients to add if necessary
- Tap the Book button to submit

Author: Rob
Last update: 2018-09-27 22:34
My working day starts earlier or ends later than what the week calendar shows? How can I change the visible hours?
The hour range that is shown in the week calendar uses the Working Days setting. For example if you have set that your working day is 8:00 - 19:00, then the calendar will display that range. If you want to see more, then widen that range:
- Go to the app's settings
- Pick an instructor (Studio) or if there's only you, then skip this step (Base/Pro)
- Set the days that you work by enabling/disabling the switches
- Set the range of hours for your working day
- You can also add intervals, for example 9:00 - 12:00 and 13:00 - 18:00, for example to block a break.

Author: Rob
Last update: 2018-09-28 09:59
Removing a client from a series of existing sessions
When you have a series of existing sessions, such as every Monday at 9:00 for 10 weeks, and you want to remove a client from all of the session at once:
- Go to the client's profile
- Select the Bookings tab
- Tap the Select button
- Select the bookings (sessions) from which you want to remove the client
- Tap the delete (bin) icon
- In the dialogue, select Just Remove [Client Name] if you want to keep the session but only remove the client. This is typical for group classes. For 1:1 appointments it is likely that you want to remove the session as well.

Author: Rob
Last update: 2018-10-11 11:22
Deleting multiple sessions at once
If you want to delelete (cancel) a series of classes or appointments in one go, you can use the appointment manager. It lets you filter for a certain set of sessions, then multi-select them and then delete them at once. Here is how that goes:
- Go to the appointment manager (the magnifying glass in the top navigation)
- Select the Bookings tab
- Optionally you can set filters if you want to delete specific sessions. In this example we have filtered for Kathy Ponz as instructor, as we only want to delete her sessions.
- Click the Select button; checkboxes now appear.
- Select the sessions that you want to delete
- Click the delete (bin) button
- Confirm deletion

Author: Rob
Last update: 2018-10-22 17:17
Adding an iOS widget to your home screen
A widget is an extension that displays a small amount of timely, useful information or app-specific functionality. Bobclass lets you add a widget with your daily class/appointments to your home screen. You can set this up as follows:
- On your iOS device, swipe to the right from the starting view until you get to see the widget screen.
- Scroll all the way down until you see the Edit button
- Press the Edit button
- In the More Widgets section, find the Bobclass widget and add it to the home screen by tapping the + button
- It now appears in the list on top where you can move it up in position by dragging the handles to the right


Author: Rob
Last update: 2018-10-29 10:05
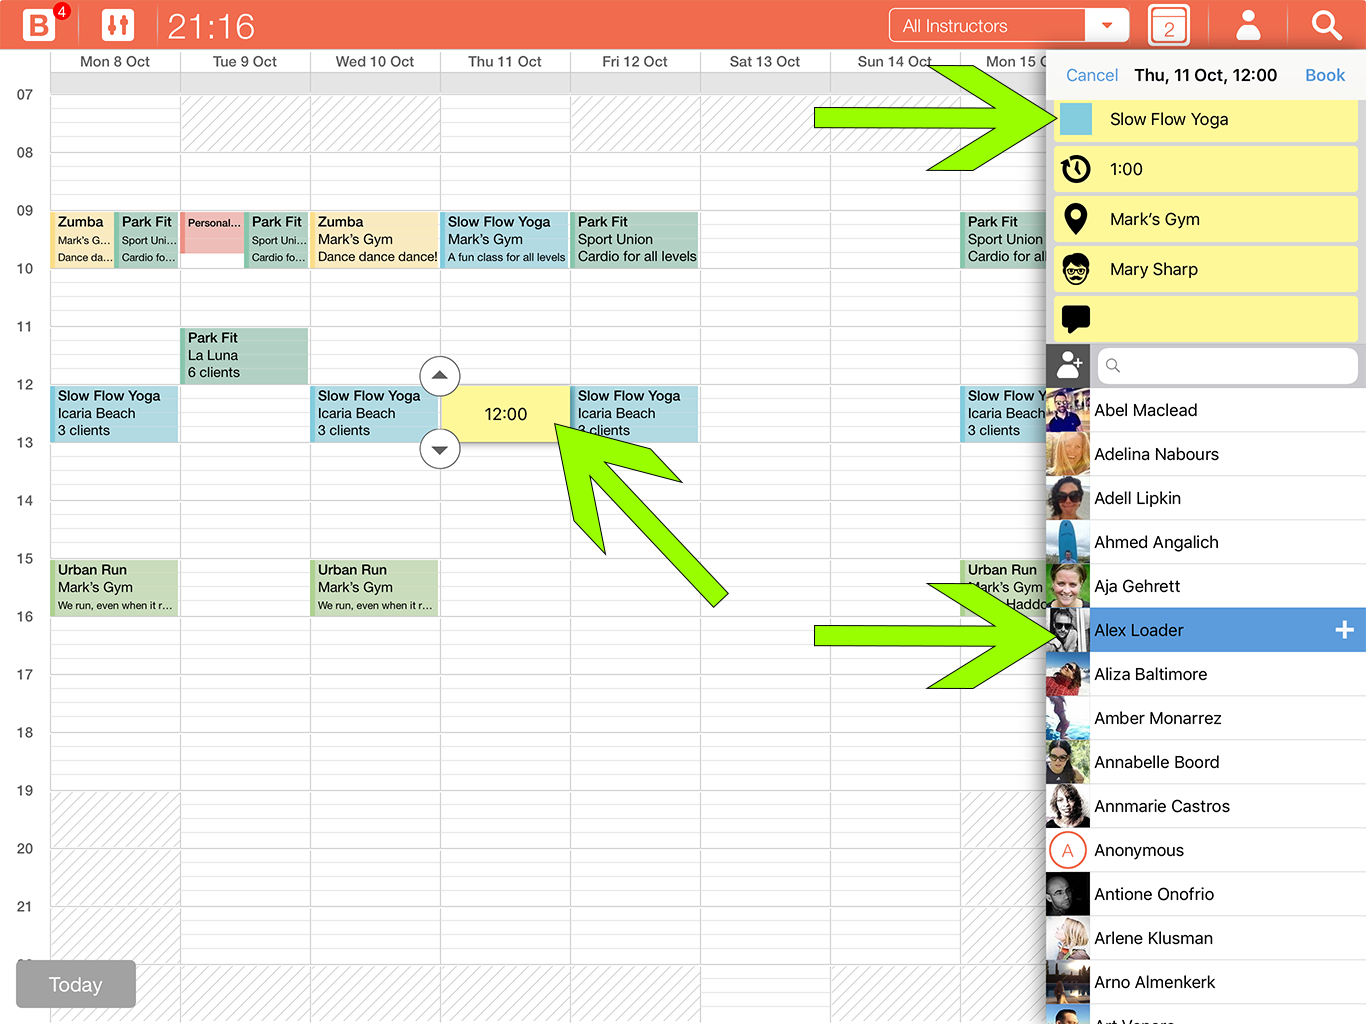
How do I schedule a class or appointment in parallel?
Note: This functionality requires a Studio license
You can create as many sessions at the same time as you want. There are two ways to do this:
1) By long-pressing an existing session
- Go to the week calendar view in the app
- Long-press on an existing session until a popup comes up. Here you'll see the details of the session that you just pressed.
- In the top right of the popup, click New Session. The rest is the same as creation a single session.
2) By first filtering the calendar for an instructor
- By default, the week calendar is unfiltered, meaning it shows sessions for all instructors, including the ones that do not have an instructor assigned to them. Click the dropdown selector in the top navigation and pick a named instructor.
- The calendar now shows the sessions for that specific instructor. Click on an empty spot to create a new session. The rest is the same as creation a single session.
- When you're done, click the instructor selector in the the top navigation again and set it back to All Instructors.


Author: Rob
Last update: 2018-11-02 14:29
Classes, Appointments...or both?
Scheduling software can be categorized roughly as follows:
- Software for class scheduling
- Software for appointment scheduling
- Software that supports both
Most software is focused on either class scheduling or appointment scheduling but some, such as MindBody and Bobclass, offer both. In practice, for many of our customers, the difference is not always clear-cut. I have seen examples of yoga studios that do primarily group classes but also offer private yoga sessions. Among our customers we also have a number of tennis coaches that mostly do 1:1s but also teach group classes to kids or club players. In this post I will take you through the different settings and behaviours in Bobclass so you can fine-tune the software exactly to your needs.
What your client sees
Let's start at the end, what your client sees when they visit your business through the web or the self service app. Here is an example of the client web interface:

You can see it live in the demo environment: http://bobclass.com/classes/courtfour and http://bobclass.com/appointments/courtfour
Here is a screenshot of the Self Service App: 
which can be downloaded from the App Store or Google Play.
In the case above you can see that both tabs are enabled, letting clients choose between finding a group class or an available slot for an appointment. If you only offer one mode, then you should disable the other in the settings (> Online Bookings) of the app:

Defining the Activity Type
All activities are set to Both by default but if you want to have an activity only appear as a class or an appointment, then you must modify that. Go to settings > Activities > select an activity and set the Activity Type. You can select Class, Appointment or Both. The Both option means that it will appear on both the class and appointment tabs so clients can book it in both modes.

Once set to class or appointment, the activity will now only appear on the corresponding tab. This prevents the 1:1 session to appear on the class roster and group classes to appear as a 1:1 appointment.
Cancellations
Your clients can cancel classes or appointments they are signed up for in the self service app but the desired behaviour for both types is different. For a class, when a client cancels - even if they are the only one participating - you do not want the scheduled class to disappear. However, for appointments this is the case: If a client cancels a 1:1 session, then the appointment must disappear from the calendar. This is exactly how Bobclass works, I just want to make sure you are aware of this behaviour.
Author: Rob
Last update: 2019-09-09 11:06
Getting started with Bobclass
Getting started 1 - Creating a Bobclass Cloud account
So you have installed the app and are ready to roll. First things first: It is important to understand the basic mechanics of the system:
Bobclass runs the database on the local storage of your device. That is why it so fast and data is always available, even offline.
You could choose just to run it only locally but what happens when you lose/break your device? Or what if you want to collaborate with team members using the same data or sharing it with your clients? Exactly, that is why you should create a Bobclass Cloud account. This will upload your data to our cloud and will keep it in sync with your device(s) at all times. Even when you add/edit something on your device when you are offline, as soon as you go back online, the changes will be synchronized to Bobclass Cloud. Here is how to create your cloud account:
- Go to the app's settings > Bobclass Cloud
- Tap Create Bobclass Cloud Account
- Enter your details and submit
- You will receive an email that you need to click to confirm the account creation. If you do not find the email, check the spam folder. Also check whether you entered your email correctly.
- Once you confirmed your account, you can log in. If you already have some calendar and client data, then it is important to do this from the device that contains the data, so not an empty one!
- The app will now start uploading the data to the cloud. Do not interrupt it.
- Once uploaded, you can log in from other devices that will then download the database.
- From this point your device(s) and the cloud database will remain in sync. You should never log out anymore.
Author: Rob
Last update: 2018-10-02 10:08
Getting started 2 - Setting up activities
Bobclass events - which can be classes or appointments - revolve around activities. An activity defines what you are going to do in the class or appointment. Examples are: Yoga Beginners, Zumba, Personal Training, Guitar Level 1. Activities can be exposed later in the client web calendars and can be used for reporting. So even when you are just offering one thing (e.g. Personal Training), then it is still recommended to define it as an activity. Once activities are defined in the settings, they can be picked from lists when creating an event in the calendar. Here is how to define the activities:
- Go to the app's settings > Activities
- Tap one of the example activities or hit the + button to create an additional one
- Enter/rename the activity
- Set the other attributes:
- Drop-in class: if enabled, the class details will show a Check In button, which lets you add clients to class quickly while they drop in.
- Maximum clients: when this amount is reached or exceeded, then the online calendars will show a Waiting List button instead of Book button.
- Public: enable this if you want it to appear on the client-facing web calendars

Author: Rob
Last update: 2018-10-02 12:44
Getting started 3 - Creating an event in the calendar
Before finetuning the configuration to your business, let's create an event in the calendar first, to get a feel of the mechanics:
- Navigate to the week calendar. If it's not visible, then click the calendar icon, which is the third from the right in the top navigation.
- Click anywhere in the calendar on an empty space. This will open up the details pane.
- Starting at the top, click the first yellow field, this will invoke a popup where you can choose an activity. Pick an activity from the list and hit Done.
- Do the same for the other fields: Duration, Location (you can define these in the settings) and Instructor (Studio license only)
- The last field is used for a description of the event. It can be displayed on the web calendar for your clients. Examples are: "Bring water", or "High octane exercise for all levels".
- Optionally - if you have clients who prebooked - you can add clients to the class. Below the search field you will see a list of clients. Double-click one to add them to the class. If you do not have any, you can create a new one by clicking the human+ icon next to the search field. You can import one or create a new one. For test purpose you should create a fictional one with your email address.
- You can now save the class by clicking the Book button.
- The app now shows a preview of an email with the client(s) as recipient(s). Make sure this all looks good and click the Send button to send the booking confirmation.
- Note that you can edit the mail/message templates in the Settings >Message templates.

Author: Rob
Last update: 2018-10-04 12:38
Getting started 4 - Repeating the class
Once you have created the class in the calendar, it is time to repeat it. Here's how to do that.
Author: Rob
Last update: 2018-10-02 22:57
Getting started 5 - Setting up products and packages
If you run a commercial business, it is likely that you will want to sell products. Bobclass lets you register sales of three types of products:
- Multi Class Passes: these are the typical prepaid packages, e.g. for 10 classes. Units are deducted when classes are consumed.
- Client Subscriptions: these are time based, the so-called memberships, e.g. 3 months unlimited training.
- Shop Products: these are physical retail products, e.g. a bottle of water, energy bar or t-shirt.
Bobclass lets you register sales of products to your clients. You can define your products in Settings > Products. Tap the + button to add a new product or tap on the name of an existing one to edit it.

Author: Rob
Last update: 2018-10-02 23:16
Getting started 6 - Selling products and packages
Once you have defined your products and packages, you can start selling them your clients. This is done through the client profile:
- Go to the client list (human icon in top navigation)
- Find the client you are selling to and click it to view their profile
- Navigate to the Sales tab
- Click the New Sale button
- Select the product that you want to sell to the client. If you do not see products here, you should first define them in the settings.
- At the bottom of the dialog, choose whether you are receiving the payment now or later
- Click Submit to save the registration of the sale
- The sale will now be visible in the table list view.


Author: Rob
Last update: 2018-10-03 10:51
Getting started 7 - Setting availability
Whether you run an appointment-based or class-based business, you will need to set when you are available for bookings. There are tree ways to do this:
- In the Settings > Working Days you can define the days and hours that you work. E.g. 9 AM - 6 PM (18h in Europe). You can split them in parts if you want to block a lunch break for example.
- In the calendar view, you can block a single day. See instructions here.
- If you just want to block a one-off hour, you can create a "fake" activity in the settings called Blocked or so and add that as an event in the calendar.

Author: Rob
Last update: 2018-10-03 11:42
Getting started 8 - Finetuning the app's week calendar display
You can optimize the week calendar in the app to your needs using the following settings:
Granularity: this determines when appointments can start; for example if you set it to 30 minutes, when you tap in the calendar, it will "snap" to the top of bottom of the hour. If you want full flexibility, you should set this to 5 minutes.
Density: this determines how many hours you will see in the week calendar at once. The higher you set this, the smaller the calendar cells will become.
Default Duration: when you tap anywhere in the calendar to create a new event, it will use the default duration, e.g. 60 minutes.
Calendar cell items to display: the switches at the bottom of the settings determine what information is shown in the calendar cell for an appointment. You can reorder them by dragging the handles.
Author: Rob
Last update: 2018-10-25 11:28
Getting started 9 - Sharing your calendar with clients
Note: This functionality requires a Pro/Studio license
There are two web calendars you can share: a class roster and an availability calendar. Typically business that offer group classes (e.g. yoga, dance) use the first, and appointment based businesses (e.g. personal training, music) the latter. Here is how to set them up:
Online Class Booking
- Go to the app's Settings > Online Booking
- Enable the top switch that says Share Classes. This will create a unique web page for you on our servers with a link (URL) that you can share with your clients. If you have a lot of data, then the creation of the web pages may take a few minutes.
- Open the Details & Settings for both to finetune things.
- If you want to allow clients to self-book, you need to enable the Self Booking switch. The web roster will now display a Book button.
- Make sure to set the Booking email field, this is where you will receive the booking requests by email, in addition to receiving them in the app itself. You can also add a Booking email CC, for example if you have an administrator or partner who you want to be kept in the loop.
Online Appointment Booking
- Go to the app's Settings > Online Booking
- Enable the top switch that says Share Instructor Availability. This will create a unique web page for you on our servers with a link (URL) that you can share with your clients, so they can pick an available slot.
- Open the Details & Settings for both to finetune things.
- Starting time sets when appointments can be booked, e.g. 30 minutes for top and bottom of the hour.
- Booking email this is where you will receive the appointment requests by email, in addition to receiving them in the app itself. You can also add a Booking email CC, for example if you have an administrator or partner who you want to be kept in the loop.
- You should experiment withe the settings here to adjust it to your needs. Once you're happy, you can share the link with your clients or embed it into your own website or Facebook page.
Author: Rob
Last update: 2019-07-21 23:40
Getting started 10 - Receiving booking requests
Note: This functionality requires a Pro/Studio license
Client booking requests will arrive straight into the app in an inbox with system notifcations so you can see instantly when a client wants to book. All you have to do is click the Accept button. Here is how it works step-by-step:
- Client navigates to your class roster or availability calendar on the web. Here some examples of class roster and availability calendar.
- Client picks a class or a slot and submits the request online.
- A few seconds later you will receive an iOS notification on your device. Click it to open Bobclass and view the inbox.
- In the inbox you will see the booking request. A client can either be an existing client or a new one. In case of a new client, when you accept the request, it will add them to your client list.
- Click the Accept button. The client is now automatically added to the class or slot.
- Next it will also prepare the confirmation message to your client. Depending on the settings, device and whether the client has a phone number, this can be an email or SMS text message.


Author: Rob
Last update: 2018-10-04 13:19
Getting started 11 - Attendance and checking in
Note: This functionality requires a Pro/Studio license
When it's time for class you'd want to do a quick and painless check-in of your clients. Depending on how you run you business, it is likely you want to one or both of the following:
- Marking a client as attended, no-show or early-cancel
- Validating whether the client has purchased a package (multi class pass or membership) that can be used for this class. If not, they need to purchase one.
For drop-in group classes (yoga etc.) the steps are as follows:
- Select the class in the calendar and click the Check In Clients button. If you do not see this button, then go to settings > Activities and make sure the activity has Drop-In Class enabled.
- In the popup that comes up, find the client that you want to check in and tap on their name twice. The client is now marked as attended.
- In the next popup you can select the product that the client may have. If they don't have one, you can select the option to sell one now.
- Back in the class details, you will now see two green checks next to the client's name, meaning they have attended and are checked out.


For 1:1 appointments the steps are as follows:
- Select the appointment. You will see the client name in the appointment details, assuming they prebooked.
- Click on the first green checkbox to mark attendance in the little dialog
- In that same dialog also click Check out which lets you select the client's product to use. If they don't have one, you can select the option to sell one now.
- Back in the appointment details, you will now see two green checks next to the client's name, meaning they have attended and are checked out.

Author: Rob
Last update: 2018-10-05 09:02
Getting started 12 - Working with multiple instructors
Note: This functionality requires a Studio license
If you run a studio with other people or use contractors to help you out, then you need to define instructors in the settings to be able to assign them to a class or training later:
- Go to the app's settings > Instructors
- You can click on an existing instructor's name or click Add New to define a new instructor.
- Edit/add the instructor in the dialogue that comes up and save it when done.
- Go to settings > Working Days and enable the days and hours when they are available.

Now you are ready to schedule a class or training with them:
- Tap anywhere in the calendar view to start creation of a new event
- In the details panel, set the activity (and location if needed). The fourth field is the instructor field (the icon with the man) where you select the instructor.
- Save the event
- Now, to schedule an event in parallel to the one you just created, long-press the event until a dialogue comes up
- Here, you click New Session, where you'd do the same as before - creating a new event - but now you'd select a different instructor
- Save the event
- In the calendar you will now see the two events next to each other.
- At the top of the screen, where it says All Instructors, you can pick a single instructor to see their calendar.


Author: Rob
Last update: 2018-10-11 11:48
Getting started 13 - Editing and deleting multiple sessions at once
If you want to apply an action to more than one class/appointment at a time, you can do this using the Appointment Manager:
- Tap the button with the magnifying glass in the top navigation
- Select the Bookings tab
- Optionally, you can use the filters to reduce the list of sessions
- Tap the Select button
- Mark the checkboxes for the sessions that you want to edit or delete
- Tap the edit button (the pen icon) if you want to change Activity, Duration, Location or Instructor
- Tap the delete button (the bin icon) if you want to delete the selected sessions
- Tap the human icon if you want to add a client to the selected sessions

Author: Rob
Last update: 2018-10-28 20:28
Reports
Reporting - Overview
Bobclass offers three types of reporting:
- Internal reporting for the business owner about sales, payments, attendance, bookings etc. The results are shown in the app in list views that can be exported to a .csv file.
- Instructor reporting for instructors/contractors to inform them about their schedule. The schedule can be created as a PDF, sent by email or printed.
Author: Rob
Last update: 2019-12-31 09:10
Internal Reporting
Internal reporting is intended for the business owner to inform them about sales, payments, attendance, bookings etc. The results are shown in the app in list views that can be exported to a .csv file. This file can be imported in Excel and accounting or invoicing software.


Author: Rob
Last update: 2018-10-18 12:25
Instructor Reporting
Instructor reporting is intended for instructors/contractors to inform them about their schedule. The schedule can be created as a PDF, sent by email or printed. Here is how to create a report or roster for one or all instructors:
- In the top navigation, open the instructor selector
- Click on the mail envelope icon
- Select the time range
- Select what to include in the report
- Select format


Author: Rob
Last update: 2019-12-31 09:01
Client management
How can I delete clients?
There are two ways of deleting contacts from your clients list:
- One by one by left-swiping on a contact name
- Multi-selecting contacts and then deleting them all at once


Author: Rob
Last update: 2018-11-03 20:23
Client list filtering and display
The client list is accessed by tapping the human icon in the top navigation. By default the list is unfiltered and contacts are displayed in the First Name - Last Name format. You can change the filtering and display as follows:
- Tap the Display row at the top of list to display the options
- Select the preferred Format and Filter options
- Tap Clients to go back to the list
Pro and Studio users will also see a ticket icon next to the client name which indicates the status of the purchased product:
- A gray ticket icon means that the client still has >30% of their credits or time left on their product. E.g. a punch pass of 10 units of which only 6 were used.
- A red ticket icon means that the client has <30% of remaining credits or time on their product. For you as the business owner, this can be used to actively target these clients to urge them to renew.


Author: Rob
Last update: 2018-11-04 12:07
Sending an email to multiple clients at once
Bobclass lets yoy filter a client list and then select the clients to whom you want to send an email. You can also attach an image or video from your device or pull a document from a cloud drive to attach to the email.
- In the top navigation, tap the human icon to invoke the client list
- Optionally, filter the list by tapping the Display (all) link at the top of the list. You can for example select only those customers who do not have any upcoming sessions, to remind them of what you have to offer in the next weeks.
- Tap the Select button to enable the checkboxes for selection
- Tick the checkboxes next to the contact names or use the double-check icon button at the top to select all displayed contacts
- Tap the mail envelope icon
- Pick the option Send Message (for sending reports, learn more here)
- An interstitial message may come up if one or more of the selected clients do not have an email address.
- In the text dialogue, write the body text of the email that you want to send
- Click the image button if you want to add an image, video or document: This will let you select from your device's storage or external cloud drives.
- Once you're happy with the content, tap the Next button to get an email preview. This will use your device's email application. If this is not set up correctly, you should troubleshoot here. If you are not happy with the default email address from which the email is going to be sent, you can learn how to change that here.
- The email preview comes up showing the recipients in bcc: (to protect their privacy) and the content and optional media below that. You can still edit the email here before sending it out.
- Tap the Send button to send the email. Since it is using the default email application of your device, you should be able to find it there in the Sent folder.


Author: Rob
Last update: 2018-11-04 12:49
Sales and Payments
How do I adjust the amount of credits on a class pass?
In an ideal world, a client purchases a class pass with e.g. 10 units and then uses those to attend classes, while the system counts down the number of units down to zero. But sometimes you need to adjust the amount manually, for example when you just started with Bobclass and want to move clients' packages over from an old system. Another case is when you accidentally deleted a checked out class, which does not add the units back on to the clients' passes!
You can adjust units and consumption by using the Units and Unit Correction fields when editing a sale for a client:
- Go to a client's profile and select the Sales tab
- Click the sale you want to adjust
- If you want to modify the total amount, clicks the Units field. What you see here is what the system counted, so 2/10 means 2 units were consumed out of a total of 10.
- If you want to modify the consumption of units, click the Unit Correction field. The amount you enter here will be added to the amount that the system counted so far. For example, if you enter 1 here, then the new amount of consumed units will become 3, using the example of the previous step.
- Save the dialog

Author: Rob
Last update: 2019-01-14 10:59
Selling products and services online
From within the app, you can activate your own online store, which is a web page that shows the products that you have defined in the app. The products have a name, price and a currency and your clients can buy and pay them using a credit card, Apple Pay, Google Pay or other localized payment methods. The payments are processed using Stripe. For you as a merchant, in order to activate your online store, you will need to create a Stripe Merchant Account. Once this is set up, you can start receiving payments for sales online. Stripe charges 1.4% + 20p/0.25€/30¢ for all European cards and 2.9% + 20p/0.25€/30¢ for all non-European cards. Note that credit card data entered into the payment form is never sent to our servers. Stripe is PCI Level I encrypted so all of the transactions are protected from a potential data breach.Learn more about Stripe on stripe.com.
Note that you need to be connected to Stripe to be able to sell online and send invoices.
Setting up your online store in steps:
- Navigate to the app's settings > Payment Methods and tap the Connect with Stripe button. This will take you to a Stripe form where you can create your own merchant account. Here's where you enter your business details and bank account number where you want to receive payments from your clients. Once approved, you can proceed to logging in.
- Once logged in, navigate to the app's settings > Online Booking where you need to enable the Online Store. Your own web page is now created. You probably also want to enable your public Class schedule or Instructor Availability here, depending on how you run your business.
- Your Online Store has a unique web page link which you want to share with your clients. You can find it by clicking the Edit Company Profile Details button at the top. You will find the link in the dialog together with a Share Link button to send it over to yourself or your clients. Note that in this same dialog you can also set your contact details, which will be displayed on your web page. Click the link in blue to test it. This will open the page in a browser
- Click on the Store tab to view the products that you sell. If you don't see any products you should go back to the app's settings > Products to define them. Make sure that the Public switch is enabled for the products that you want to sell online, otherwise they won't be displayed.
- Next, you want to pretend you are a client who wants to buy a package. Click the BUY button for a product of choice. This opens the Payment Request popup where the client enters their contact details. This only needs to be done once per session. Hit the NEXT button to proceed.
- The next step for your client is to enter their payment details. They can pay using a credit card (Visa, Mastercard, Amex), Google Pay or Apple Pay. You should tell your clients to enable Google Pay or Apple Pay on their devices as these are reliable and convenient payment methods.
- Once payment was processed, there will be a Thank You confirmation message and at the same time your client will receive their receipt.
- Your iPad or iPhone will show an instant system notification when payment was received.


Author: Rob
Last update: 2019-04-18 10:45
Sending an invoice link to a client
The Stripe payment integration allows you to send an invoice link to a client which they then click to view and pay. It will show the product they have purchased and the amount with a Pay button. Clicking that button lets them securely pay through Apple Pay (on iOS devices when enabled), Google Pay (in Google Chrome and Android devices when enabled) or by credit card (all devices). Once payment is processed - this is a matter of seconds - you will receive an instant iOS notification and will find the payment in the Payment tab of the client's profile in the app.
Note that you need to be connected to Stripe to be able to sell online and send invoices.
There are three different flows in which you can use the invoice links:
When doing a client check-out
For both drop-in or pre-booked clients, you'll check them out to make sure they have an active package to use for class. If they do not have one, then you can sell them one on the spot.
- In the dialog that comes up, you select Sell package now and in the next dialog you'll pick the package you want to sell.
- In the Payment Type dialog, you'll need to pick one of the last three options to send the invoice link to your client. In this case we pick the last option which offers a number of sharing options provided by iOS, such as AirDrop. If the client who is standing in front of you uses an Android phone, you'd want to pick SMS or email.
- Your client now receives the link which opens a web page with the invoice detais. The client will press NEXT to proceed.
- In the following screen the client will execute the payment. Depending on the operating system (iOS, Android, Windows, Mac) of their device either Google Pay, Apple Pay or credit card will be offered.
- The client confirms the payment which is then instantly processed by Stripe. You will receive a notification and your client will receive the receipt.


When doing a sale - at the same time
From the client's profile you can register a sale directly and send the invoice link instantly to the client so they can make the payment against it.
- Select the client's profile and navigate to the Sales tab
- Tap the New Sale button which will invoke the products dialog
- Select the package that you want to sell, etc. the rest is identical to the first flow described above.

For a past sale that has status Unpaid
- If you sell packages but do not receive payment at the same time, you can send the invoice later.
- Navigate to the magnifying glass in the top navigation to get to the overview pages
- Select the Sales tab and look for a sale that has status Unpaid
- Click the Unpaid link and select how you want to share the invoice link, etc. the rest is identical to the first flow described above.

Author: Rob
Last update: 2019-04-18 10:45
Self Service Client App
How does the Self Service App for my clients work?
Overview
The Self Service App is a free app for your clients that lets them connect to your business so they can manage bookings, cancellations and payments themselves. It also lets them view progress notes that you write for them.
How to do I get my clients to download it?
You will need to point them to the Apple App Store or Google Play Store where they can download the app for free. The Self Service App is available for both Android and iOS. Here are the direct links, which you should share with your clients by email, message, social media etc.
iOS:
https://apps.apple.com/us/app/bobclass-self-service/id1458100338
Android:
https://play.google.com/store/apps/details?id=com.bobclass.bobclass_mobile
You can use the following text:
Connect with us with your own Self Service App so you can manage bookings and payments yourself! Download it for your iPhone, iPad or Android on the App Store or Google Play Store, then register first. Once you are signed up, the app will retrieve your upcoming bookings and active packages that you have with us. Make sure to use the same mobile phone number as we have, so the system can do the matching.
Also in the main app you can select your clients and then send a bulk mail/message to them, pasting the links in the body:

What do I need to do?
Make sure that you have a valid mobile phone number for each client in your contact list in the (instructor) Bobclass app. Click on the human icon, select the client and check their phone number. This is important because the Self Service App uses their mobile phone number to match them with your studio. If they cannot connect to your studio, this is most likely because their mobile phone number does not match with the one you have stored.
Can I test it myself first?
Yes. There are two different ways to test it:
- Create a client in the main (instructor) Bobclass app with your name and your mobile phone number. So simply pretend to be your own client. You can then SIGN UP using that same phone number in the client Self Service App and log in once that is done.
- Or use the test login which uses phone number +44 (UK) 1234567890 and pin code 123456. No need to sign up in this case, just log in directly.
What does my client need to do?
They need to download the Self Service App and then first sign up. This will register them and will do the matching of their mobile phone number with your business. If your client says they cannot get in or get a "no match" message, then you should check whether they actually have signed in first (as opposed to logging in). The other reason could be that the phone number they use is different from the one you have in your Bobclass app.

Is booking fully automatic?
Yes, it can be but there are a few conditions:
- You will need to enable auto-booking in the instructor app. Go to Settings > Online Booking > Details & Settings and enable the Automatic Booking switch.
- The client needs to be a known client. When they book via the app, this always the case but when they book via the web, this may not be the case.
- The client needs to have an active package. If they do not, then you will need to manually approve the booking request in Bobclass.
What can my clients see and do?
Once registered and connected to your studio, your clients can do the following:
- View and book into your scheduled classes (for group classes)
- View and book available slots (for 1:1)
- Purchase packages using a credit card
- View active packages and the remaining credits or time
- View classes or appointments they have signed up for
- Cancel classes or appointments they have signed up for
- View progress notes that you have shared with them (which you do in their profiles > Progress and then enable the Visible switch for each note that you want them to see:

Author: Rob
Last update: 2019-08-16 10:45
How to add photos and descriptions to classes, events and your company profile
An image is worth a thousand words - so goes the proverb. If you're offering classes or personal sessions to your clients, the importance of images should not be underestimated as they can convince your (potential) clients to trust you, sign up and come back. The good news is that Bobclass now lets you add images and descriptions to your activities, so you can entice your audience. You can also add images to your company profile. The images and descriptions will appear "on the other end" in the Self Service App for your clients. Here is how it all works.
Activity Images
Activities are defined in the settings. It does not matter whether you offer group classes or 1:1 appointments, they all use an activity. Go to the settings > Activities and select one. In the edit window, notice the new field "Photos". Here is where you want to add your content.

Activity and Event Description
Now here is where I want you to pay attention. There are two descriptions: One for the activity in general and one for a specific event (class/appointment) that uses this activity. Both the activity and event description appear in the Self Service App, one below the other:

The activity description is defined in in the settings, per activity and is the same for every event where you use this activity. It is generic and informs your client what this class/appointment is about.

The event description is almost like a comment and is specific to that one event for a certain date and time. So let's say you are running a weekly running class and this week you want to do something special (e.g. a night run), then you would put that in the event description ("bring headlamp"). You can add an event description by editing an existing event and tapping on the last yellow field.

Company Logo, Description and Photos
A company logo, attractive photos and a clear description of what you offer, should all be part of your marketing mix. In Bobclass you can add these so that they will appear in the Self Service App for your clients. Navigate to the settings > Online Booking and click the top blue button where it says "Edit Company Profile Details". On the next screen, enter the description, logo and studio images.

In case you have not done so, you should point your clients to the Apple and Google app stores to download the Self Service App. More information here.
Author: Rob
Last update: 2019-09-16 11:42